libpcap入门教程
libpcap是一个开源的,用于捕捉网络包的库。可以在大部分*nix系统下运行。另外,
还有一个windows版本的叫做winpcap。
包捕获
包捕获是收集网络上数据的过程。
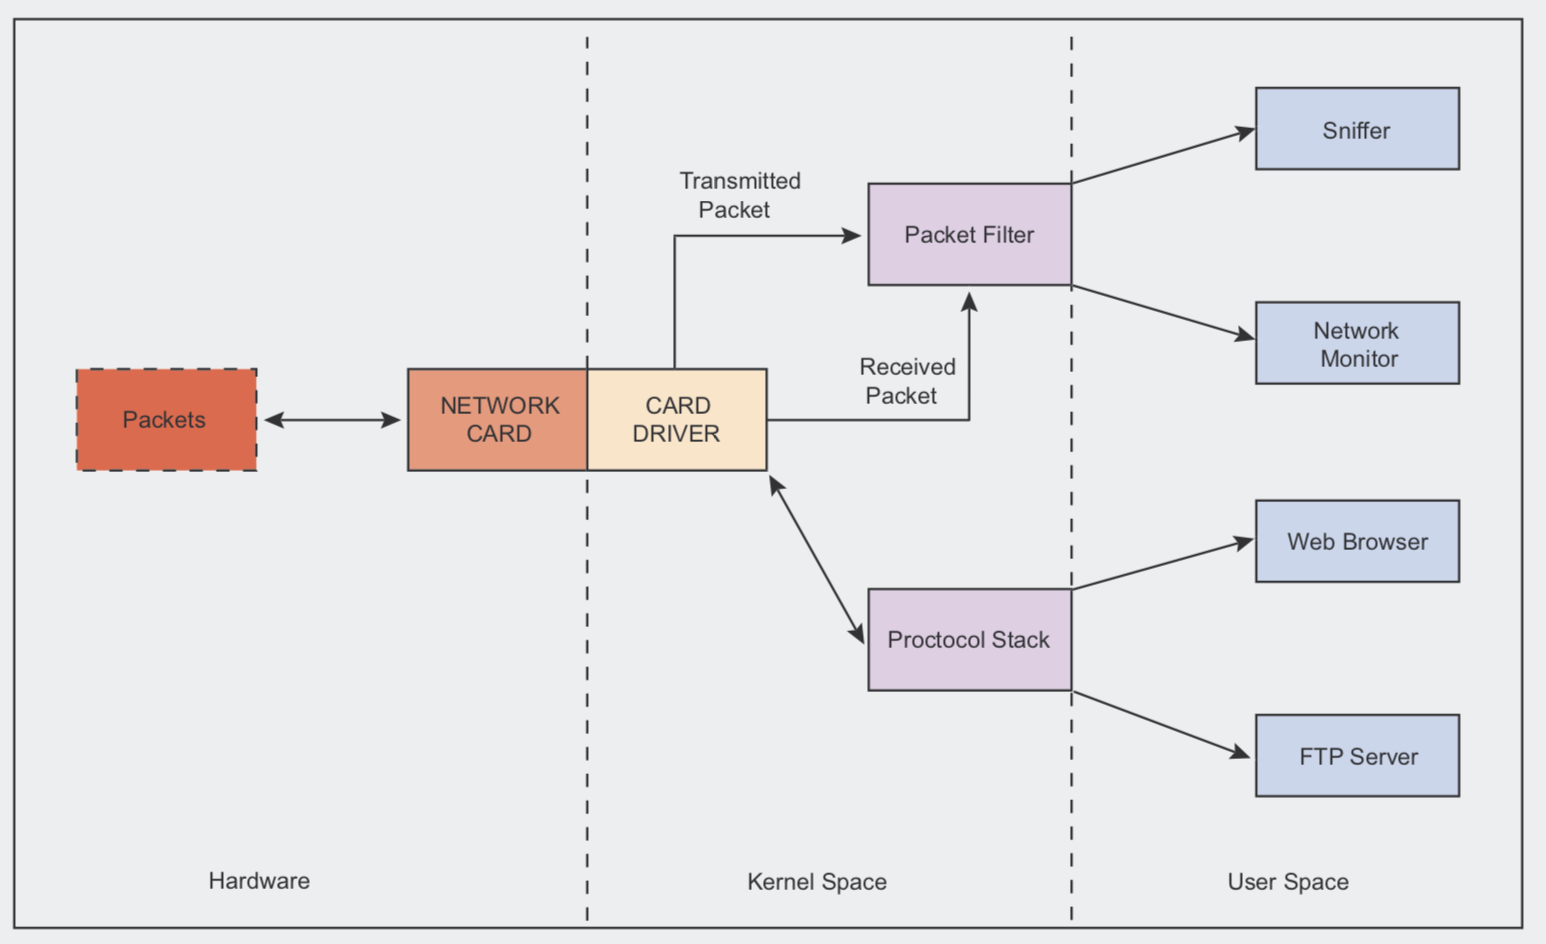
首先看一下以太网的包捕获过程。当网卡收到一个以太网数据帧的时候,网卡检查目标的mac地址是否跟它的相等,
如果相等,它产生一个中断,网卡驱动处理这个中断信息。网卡驱动接入数据,并且把它复制到内核空间的一块内存中。
然后它检查ethertype字段,来决定哪个协议栈处理。
当我们使用嗅探器的时候,上面的处理流程还是一样的。但是,网卡驱动还把把复制一份发送到包过滤器的内核模块。
然后包过滤器交给包捕获的程序进行处理。如下图

使用libpcap进行抓包
libpcap使用只需要遵循以下5步即可
1. 指定监听的网口设备
指定监听的网口,可以明确进行指定,也可以通过pcap调用取得第一个可用的网络设备。
明确指定网口,直接用网口的名字就行了。在linux下,可以通过ifconfig来查看所有的网口。
pcap提供了以下的接口来获取第一个可用的网口:
char *pcap_lookupdev(char *errbuf);
函数返回了第一个可用网口的名字。出错时,错误信息会通过errbuf返回。errbuf的空间必须提前分配好,
而且最小长度为PCAP_ERRBUF_SIZE(当前值为256)。
以下为一个例子:
#include <stdio.h>
#include <pcap.h>

int main(int argc, char *argv[])
{
    char *dev, errbuf[PCAP_ERRBUF_SIZE];

    dev = pcap_lookupdev(errbuf);
    if (dev == NULL) {
        fprintf(stderr, "Couldn't find default device: %s\n", errbuf);
        return(2);
    }
    printf("Device: %s\n", dev);
    return(0);
}
pcap提供了一个特定的网口,名字为any,指定所有可用的网口。
2. 打开监听的设备
pcap提供打开监听设备的接口也很简单,如下:
pcap_t *pcap_open_live(char *device, int snaplen, int promisc, int to_ms, char *errbuf);
device参数是我们在第1步中指定的网口。
snaplen参数设定捕捉包的长度。在我们只希望查看包头的情况下,非常有用。默认的以太网包长为1518字节,
最大为65535。在pcap.h头中定义了一个BUFSIZ。
promisc参数指定是否打开混淆模式。关闭混淆模式,则只捕捉进入本机或者在本机路由转发的包。 打开混淆模式会捕捉网络上所有的包。另外,这个配置还受网卡的混淆模式影响。如果网卡设置了关闭混淆模式, 则这里即使打开也没有用。
to_ms参数指定数据从内核态复制到用户态等待的时间。由于从内核态切换到用户态,需要比较大的性能消耗。 越低的值,性能消耗越大。如果是0,则会一直等待到有足够的数据,才能复制到用户态。tcpdump使用了1000。
errbuf参数跟第1步的errbuf一样,用于出错时,保存错误信息。
返回参数为后续需要使用到的session。
例子:
#include <pcap.h>
int main
{
	 pcap_t *handle;

	 handle = pcap_open_live(dev, BUFSIZ, 1, 1000, errbuf);
	 if (handle == NULL) {
		 fprintf(stderr, "Couldn't open device %s: %s\n", dev, errbuf);
		 return(2);
	 }
}
3. 设置过滤条件
设置过滤条件需要分三步:
- 找出当前网口的掩码。
- 编译过滤条件。
- 设置到上一步返回的session中。
找出当前网口的掩码
pcap_lookupnet原型如下:
int pcap_lookupnet(const char *device, bpf_u_int32 *net, bpf_u_int32 *mask, char *errbuf);
device参数为第1步中指定的网口。
net参数为返回网络码。
mask参数返回掩码。
errbuf为出错时的错误信息。
函数出错时返回-1。
编译过滤条件
编译过滤条件的函数原型如下:
int pcap_compile(pcap_t *p, struct bpf_program *fp, char *str, int optimize, bpf_u_int32 netmask);
p参数是第2步的返回值。
fp参数是过滤条件编译出来的结果。我们不太需要关心其具体的结构内容,只需要把它传给下一步的调用即可。
str参数为我们写的过滤条件表达式,比如port 23之类的。更详细的过滤条件,可以参考pcap-filter手册
optimize参数指出表达式是否需要优化。
netmask参数指定网络的掩码。我们可以通过pcap_lookupnet来找出对应的掩码。
错误时返回-1,成功时返回其他值。
设置过滤条件
设置过滤条件的原型如下:
int pcap_setfilter(pcap_t *p, struct bpf_program *fp);
p参数为第2步返回的值。
fp参数为编译出来的过滤条件。
函数错误时返回-1,成功时返回其他值。
例子:
#include <pcap.h>
int main()
{
	pcap_t *handle;		/* Session handle */
	char dev[] = "rl0";		/* Device to sniff on */
	char errbuf[PCAP_ERRBUF_SIZE];	/* Error string */
	struct bpf_program fp;		/* The compiled filter expression */
	char filter_exp[] = "port 23";	/* The filter expression */
	bpf_u_int32 mask;		/* The netmask of our sniffing device */
	bpf_u_int32 net;		/* The IP of our sniffing device */

	if (pcap_lookupnet(dev, &net, &mask, errbuf) == -1) {
	    fprintf(stderr, "Can't get netmask for device %s\n", dev);
	    net = 0;
	    mask = 0;
	}
	handle = pcap_open_live(dev, BUFSIZ, 1, 1000, errbuf);
	if (handle == NULL) {
	    fprintf(stderr, "Couldn't open device %s: %s\n", dev, errbuf);
	    return(2);
	}
	if (pcap_compile(handle, &fp, filter_exp, 0, net) == -1) {
	    fprintf(stderr, "Couldn't parse filter %s: %s\n", filter_exp, pcap_geterr(handle));
	    return(2);
	}
	if (pcap_setfilter(handle, &fp) == -1) {
	    fprintf(stderr, "Couldn't install filter %s: %s\n", filter_exp, pcap_geterr(handle));
	    return(2);
	}
}
4. 捕捉包
通过以上的初始化工作后,就可以真正的开始捉包了。捉包有三种方式,pcap_next, pcap_loop, pcap_dispatch。
pcap_next
pcap_next一次只抓取一个包。
原型如下:
struct pcap_pkthdr {
		struct timeval ts; /* time stamp */
		bpf_u_int32 caplen; /* length of portion present */
		bpf_u_int32 len; /* length this packet (off wire) */
	};
u_char *pcap_next(pcap_t *p, struct pcap_pkthdr *h);
p参数为第2步中的返回值。
h参数为传出参数。
返回值为捕捉的包内容。
例子:
#include <pcap.h>
#include <stdio.h>

int main(int argc, char *argv[])
{
    pcap_t *handle;			/* session handle */
    char *dev;			/* the device to sniff on */
    char errbuf[pcap_errbuf_size];	/* error string */
    struct bpf_program fp;		/* the compiled filter */
    char filter_exp[] = "port 23";	/* the filter expression */
    bpf_u_int32 mask;		/* our netmask */
    bpf_u_int32 net;		/* our ip */
    struct pcap_pkthdr header;	/* the header that pcap gives us */
    const u_char *packet;		/* the actual packet */

    /* define the device */
    dev = pcap_lookupdev(errbuf);
    if (dev == null) {
        fprintf(stderr, "couldn't find default device: %s\n", errbuf);
        return(2);
    }
    /* find the properties for the device */
    if (pcap_lookupnet(dev, &net, &mask, errbuf) == -1) {
        fprintf(stderr, "couldn't get netmask for device %s: %s\n", dev, errbuf);
        net = 0;
        mask = 0;
    }
    /* open the session in promiscuous mode */
    handle = pcap_open_live(dev, bufsiz, 1, 1000, errbuf);
    if (handle == null) {
        fprintf(stderr, "couldn't open device %s: %s\n", dev, errbuf);
        return(2);
    }
    /* compile and apply the filter */
    if (pcap_compile(handle, &fp, filter_exp, 0, net) == -1) {
        fprintf(stderr, "couldn't parse filter %s: %s\n", filter_exp, pcap_geterr(handle));
        return(2);
    }
    if (pcap_setfilter(handle, &fp) == -1) {
        fprintf(stderr, "couldn't install filter %s: %s\n", filter_exp, pcap_geterr(handle));
        return(2);
    }
    /* grab a packet */
    packet = pcap_next(handle, &header);
    /* print its length */
    printf("jacked a packet with length of [%d]\n", header.len);
    /* and close the session */
    pcap_close(handle);
    return(0);
}
pcap_loop
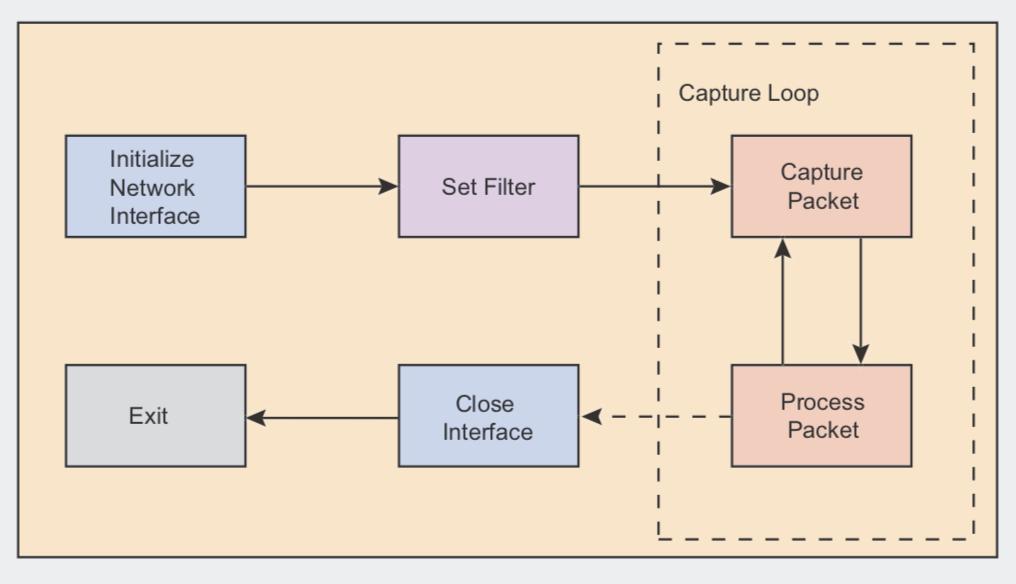
pcap_loop是更加经常用到捉包函数。它使用一个回调函数,当抓到包时,就调用加调函数进行处理。
然后继续捉包,如果循环。它的处理流程如下图:

pcap_loop的函数原型如下:
int pcap_loop(pcap_t *p, int cnt, pcap_handler callback, u_char *user);
p参数为第2步的返回值。
cnt参数表示要捕捉的包数,负数表示不限制。
callback参数为处理的回调。回调原型如下:
void got_packet(u_char *user, const struct pcap_pkthdr *header, const u_char *packet);
其中user参数跟pcap_loop中的user参数一致。header参数跟pcap_next的h参数一样。packet参数为抓到的包。
user参数用于做透传,为了把传到回调函数中使用,可以通过此方式值进行。
那么我们主要的工作就在回调函数上了,在回调函数上,我们需要解析出链路层、网络层、传输层、应用层相关的数据。 最后,在应用层取出payload数据后,进行我们的业务协议解析。
pcap_dispatch
pcap_dispatch与pcap_loop类似,它一直返回耗时。
5. 关闭pcap
关闭pcap原型如下:
void pcap_close(pcap_t *handler);
把第2步的返回值传进行进行关闭即可。
引用
http://recursos.aldabaknocking.com/libpcapHakin9LuisMartinGarcia.pdf http://www.tcpdump.org/pcap.html